Sunday, February 2, 2014

You say Pakoda, I say Bakoda


Bakoda is a nice crispy snack and pretty easy to make. It makes a great appetizer.
 
My mom would make all kinds of Bakodas. Coriander Bakoda, Mint bakoda, Cashew Bakoda and ofcourse, the famous onion Bakoda. 

Today I have used onions, a bit of methi, a bit of coriander and some cashews.

For about 8 to 10 servings you need:
Chopped onions - 4 cups
Salt- 1.5 tsp (I use sea salt in my cocking, pls adjust the salt measurements according to the salt u use)

First chop the onions and add the salt and mix it well and keep it aside for 10 mins. You will see that the onions let out water because of the salt.

In the mean while, keep the oil on the stove on a medium high flame. 

Now add 
1 and 1/2 cups of gram flour
1 and 1/12 cups of rice flour
1 tsp of turmeric powder
1 tsp of chili powder
6 or 7 green chilies chopped
* I added a handful of chopped coriander leaves and methi leaves, this is optional
2 strands of fresh curry leaves
2 tsp of ghee

Mix everything well. Do not add any extra water, keep mixing it and u will see that it becomes a thick paste like dough. 

Check if the oil is ready by adding a small ball of the dough to it. It should come up and start to get golden brown in color. 

Once u see that it's ready, pinch the dough on to the oil. Bakodas should be shapeless and that's how they get crispy.


Tuesday, July 9, 2013

Dill Raita


Dill was on sale in my local Indian store.I wanted to make the Dill Raita as an accompaniment to the Aloo Paratha I was planing to make for dinner. It was as simple as can be.
Dill - One Bunch (probably 1 cup washed ,chopped and filled tightly)
Yogurt - 2 Cups
Sour Cream - (Optional) 2 Tablespoons
Salt - As Needed
Garnish
Oil - 1 tsp
Garlic - 4 Cloves (Chopped)
Ginger - 1 Inch Piece (Peeled and Chopped)

--->Wash the Dill
--->Drain it well
--->Chop it
--->Beat the Yogurt and Sour Cream well
---> Mix in the Chopped Dill
--->In a Pan, add the oil, and when it gets hot, add the chopped garlic and ginger to it and saute for a few minutes
---> Add the garnish to the yogurt and dill mister.
--->Just before serving add salt, so it doesn't get watery

An option is to ad some cucumbers to this, in case you dont like the stong taste of Dill. It is tastes better than the tzatziki you get from costco!

Serve with Hot pulav or Roti or Paratha 

Gulab Jamuns Made from Scratch!

Yes, you read the title right, its not from a mix, and no you do not need Khoya!

Jamuns with slivered Almonds


I learnt to make these from Santosh, a good friend of mine. She ran a successful catering business  and is a great cook. I really enjoyed learning the recipe from her. Also equally enjoyed the Punjabi Kadhi with ghee on top and the Baingan Bharta that I had (while learning) for lunch at her place :)

By far, these are the best Jamuns I have ever had in my life. That's saying something because I don't have a sweet tooth.

Well, here it is
You will need
a Food Scale
a Deep fryer (optional) for best results.

For Jamuns: (to make 30 small round jamuns or 20 oblong ones)

3oz of Bisquick Pancake Mix
4 oz of Milk Powder
5 oz of Heavy Cream.

For Sugar Syrup. (for above measurement)

2 Cups Sugar
2 Cups Water
Saffron - a pinch

In a heavy bottomed pan, add both sugar and water, Mix and let boil on a medium flame. Once the sugar is melted add the saffron, switch the stove off and let cool. Please note the syrup will be thin. Not thread consistency. Should easily flow from the spoon.

If you are making it in summer, start with placing the Heavy Cream in the freezer before measuring your ingredients. (For about few minutes so it will be extra cold)
 Measure the above ingredients to a tee.
Mix the dry ingredients (Bisquick, Milk Powder) well.
Then slowly add the Heavy cream to it, and make in to a nice soft dough. It should be soft to touch and not be sticky.
This usually takes 5 to 10 minutes of kneading.
Now just divide the dough in two and then make small balls out of them. Make sure they are almost the same size, so they will all get cooked evenly.
You can make oblong ones or round ones.
The oblong ones are trickier, if not made well, they might break in oil.


If you have a fryer, add enough oil and keep it a temperature of 350 deg. Otherwise, in a kadai, make sure the oil is hot but not too hot. Santosh says to keep extra oil on the side, so if the oil in kadai gets hot, add some to cool it down.
I made it once in a kadai and the next time in a fryer. I felt the fryer jamuns turned out better, because the temperature was maintained through out and also it was not oily. I also added a bit of ghee in the oil the second time around.

When you fry them, move the oil around with the ladle, but try not to touch the jamuns.
In the fryer it takes a good 1 to 2 minutes for them to become completely golden brown.

Once the jamuns are fried, just drop it in the sugar syrup immediately. They absorb the sugar water and double in size :)


The variation to this is Kala Jamun. With the same measurement, to the dough add, a tablespoon of sugar. This caramelizes and the jamuns become dark.

Decorative ideas,

- You could make oblong or round ones, and place them in cupcake liners.
- Cut the Jamuns in Half, get the pastry decoration from a store, and make designs on them
- you can sprinkle almonds or any other kinds of nuts.

When the jamuns are cool and have absorbed the syrup. You store them in the fridge for up to a week. 
When making it for a party, these can be made a day ahead. Will taste much better too. 

Monday, April 22, 2013

Kitchen Mishaps!

Warning: this post has no recipes what so ever. Just a collection of funny incidents that happened over the years in our family.

Well, this whole thing started with me making Rava Dosai for dinner. It was a long day and I was tired and in my hurry to make the dough, I picked up the Cream of rice / idli rava instead of rava and made the dough. When I was making the dosas, it was not getting crispy and not getting cooked enough at all. Still my family enjoyed them and had at least 4 each, while appreciating the 'tasty' rava dosais. I realized my mistake the next day and told them what I did. And then one by one went, 'Oh! Is that why it was not good', 'Oh! Is that why it was not crispy' 'Oh! Is that why it was not cooked'. We all had a good laugh about it.

I was telling about this incident to my grandma(paati) and she recalled this particular incident.
It was a time when they had moved to a new house and all the stuff in the kitchen was all over the place. My aunt was there during the move but had to leave to her husbands house by train in the evening, so she quickly arranged the kitchen for my paati before she left.
My Grandpa(Thatha) was hungry in the evening and asked if my paati could make 'Gothumai (Wheat Flour) Dosai' for him to eat. Gothumai dosai is very similar to rava dosai except its made with Gothumai (Wheat Flour), Maida(All Purpose Four). Well, my paati made the dosai with what she thought was Maida but it was actually bleaching powder. She was struggling to make the dosai, and somehow made a few and served it to him on a plate. She also had tasted the first itty bitty one, and thought it tasted a bit funny but was too tired to notice anything major.As soon as he had the first one, he felt that his throat was on fire. He immediately lied down and accused my paati of serving him a poisonous dosai and said that he was going to die soon :) My paati found the whole situation funny and was giggling and said 'What are you talking about'. Just at that time, my (Chithapa) Thatha's younger brother who's is actually my Chinna thatha but since my mom and uncles called him chithapa all the grand kids also called him chithapa (who lived diagonally opposite us) happened to be passing by out house and stopped to say hello. He noticed that my thatha was lying down rather uncomfortably and asked him about it. My thatha narrated the whole story and then my Chithapa turned and asked my paati, 'Well if you wanted to poison him, why go out of your way and make dosai out of it, why not just give it directly!'
That's how matter of fact we are in our family!!
And then he tasted it and found that it was bleaching powder and told my thatha he had nothing to worry about and asked him to drink a litre of water to wash it out!

This one again involves my paati, the time she made Rava Kesari. She let the sugar melt and then when it was time to add rava, she added sugar again and then was wondering why it was all melting and not coming together!

Speaking of crazy families, our family friend also have equally crazy incidents. My aunt told me was how her friend 'Mrs.C' had gone for a wedding in the morning and told her family that she would do a simple 'paruppu podi' dinner. She put hot rice and ghee on everyone's plates and then put a spoonful of paruppu podi. When her son tasted it, he complained something was wrong with it and 'Mrs.C' chided everyone until she had a taste of it, the alleged 'paruppu podi' was actually Horlicks!!

 This is my cousin S's first experience making Mango Cake in the form of a poem!

My attempt @ Eggless Mango Cake By S
Was my first baking experience (alone) ever.
So all the baking equipment including measuring cups & spoons, ingredients & me got together.

Made a near perfect dough – “perfect”, according to my standard.
Poured into the baking tin & off it went into the oven and me hoping my baking journey would continue onward .

The oven is new so is being tested for the first time so..
It conked off!! Tried once again but it wouldn’t budge & so hard we did try though!

But giving up is not the solution right?
And so put it in one of the saviours of the kitchen for 7-8 mins – The Microwave which put up a good fight.

Now that was a whee bit too long and so the result was a spongy edible cake..
BUT.. something told me that it was going to harden up and turn into stone bake .

So what did I do? Quickly literally gobbled up two huge slices of the cake!
Almost 60% of my first “masterpiece” of a cake

Before it turned into stone and it did eventually turn into a hard rock filled with stress,
Relished the “taste” & was pretty satisfied that none of the appliances burst in the process.

And now, my baking equipment, ingredients & me are all waiting for the oven to get well soon
So that we can together bake my official first cake hoping that doesn’t turn into a mishap too!

PS – All words within “ “ are sarcasm hints.

Friday, February 22, 2013

Paruppu Podi

Podi means powder in Tamil. This is one of the mixes that can be made and stored. The days when there is no Rasam or Sambar, you can mix this with hot rice and ghee and add a 'sutta aplam' as a side.

You need
Toor Dal 1 cup
Red chillies 2 or 3
Black Pepper 1 Tsp
Hing 1 Tsp
Salt as needed
Method
Roast the dal, chillies, Black Pepper, in a thick bottomed pan, on a medium flame.

Make sure the flame is a steady medium and keep stirring the pan constantly so it doesn't burn.

You should roast this until it changes color. It took about 12 mins for me.

Add the Hing in the last two minutes.

Let cool, and grind to a fine powder.

Mix with hot rice and ghee!


Satvik Paneer

Satvik simply means pure. In this case, I call it Satvik Paneer because there is no onion and garlic in it. Also called the 'Jain' Version because of the same reason. 

On festival days, food is usually prepared without adding onions or garlic. 

When i was growing up, onions were rarely used in our house and garlic was an absolute No No. Once every blue moon when the small onion sambar was made it was an absolute delicacy. 

During the nine days of Navarathri, Onions and garlic are not used in everyday cooking. I made this as an accompaniment to the roti that was served.

Basically to make 'Jain' version of any recipe, you have to add more flavors to mask the missing onion flavor and use lots of tomatoes.


For about 4 to 6 servings here is the recipe

You Need
Tomatoes - 6
Green Chili -2
Ginger - 1 and 1/2 Inc piece
Oil - 2 Tsp
Butter - 1 Tsp
Kasoori Methi - 2 Tsp
Red Chili Powder - 1/2 Tsp
Roasted Dhaniya /Coriander Powder - 1/2 Tsp
Roasted Jeera / Cumin Powder - 1/2 Tsp
Garam Masala - 1 Tsp
Yogurt (well beaten) - 3 Table Spoons
Salt - about 1 and 1/2 Tea spoons (more or less according to your taste)
Paneer - Standard small slab that you get in the Indian store, cut in desired size

#It helps if you mix all the dry masala powder in water so there are no lumps and also the masala wont burn.
#You can prepare the Dhaniya Jeera masala powder ahead of time in a larger quantity and store. 
#Please adjust the spiciness of this Sabji to your taste.

Method

In a Food processor, grind the tomatoes, green chili and the ginger.

In a pan, on a medium flame, add the oil and butter and once the butter melts, add the kasoori methi.

Add the mixture of masala and water to this and let it come to a slow boil -about 3 to 4 minutes

Add the tomatoes mixture to this, and add salt to this and close the pan so everything can come together and thicken - about 10 minutes

Once the mixture is thick, slow down the flame and add the yogurt and mix well

On the side, if you prefer, roast the paneer a bit, (i do it, because my kids dont like the paneer if it is not sauteed, but if you don't mind you can skip this step)

Add the Paneer to this and garnish with coriander leaves.

Serve hot with Pulav or Rotis.


Butter Paneer

Butter Paneer
  I have made both the Instant Butter Paneer version posted by Chef Vah Re Vah, here, and the traditional version posted by Sindhi Rasoi, here. I dont have a picture of the Vah re Vah version. The picture above is the Sindhi Rasoi Version.
Here is my verdict........(drum roll please)

The Instant Butter Paneer is really that... instant. It just takes time to assemble the items you need.
For the first time in my life I bought fried onions. (Never knew they sell it in the stores here). And was shocked, because the onions were far beyond recognizable. The taste is exactly like the stuff you get in restaurants. But you will get tired of this in one meal.

The Sindhi Rasoi recipe was a long process, with a ton of stuff to soak, grind, fry respectively.
What you need
I did lose patience with the process by the end. Instead of grinding all the fried onions, I just ground half of the onions. Also, I always lightly fry the Paneer before adding to any subji, because that's the way my kids like it. If you like paneer, as it comes from the store, you can add it like that.
The end result was a flavorful dish. The paneer soaked in the masala nicely and was a great accompaniment to our dinner. Please get the step by step instructions from the Sindhi Rasoi blog directly.

Thursday, December 13, 2012

Carrot Celery Soup (Gluten Free)


Carrot Celery Soup with Brown Rice Pasta


Soup makes a great one pot meal, when you make it chunky and thick. This soup can be made thick or thin. I was cleaning up my fridge to buy some new veggies so these were waiting to cooked.
1 Bunch Celery (the long one)
I Small Bag of baby carrots  (which we forgot to snack on during the week)
4 Large Carrots
2 small red Radish (which somehow escaped when I made radish sambar)
A small bunch of Spring onion (bottom to fry along with the onion and top to garnish)
So I set out to make the soup.

Prep time - to cut veggies about 10 minutes
Cooking Time - Saute - 10 Minutes Pressure Cook 15 mins blend and Garnish 5 mins
You will need
Celery - Chopped in 1/2 finger long lengths
Carrots - chopped in big pieces (No need to chop the baby carrots)
Spring Onion Onion - 1 (Chopped in big pieces)
Garlic - 1 (in cloves)
Oil - 1 Tablespoon
Cilantro to Garnish
Cumin - 1 Tsp
Salt - 1 and 1/2 Teaspoon
Vegetable Broth or Water  - 1 Quart 
Butter 1/4 Teaspoon
Cayenne Pepper Powder - 1/8 Teaspoon
All Spice Powder - 1/4 Teaspoon
If you don't have these on hand, you can substitute any other spice that you like.
I feel Cayenne Pepper adds a different kind of spiciness to the soup rather than regular chilly powder.


I forgot to take a picture after adding the carrots, the  last pic was taken after the veggies were cooked in the pressure cooker, while blending them.

Method
--->In a Pan, on a medium flame, add the oil. When it starts to get hot, add the cumin, saute it till it slowly starts sizzling, add the garlic cloves, then the onion  and spring onion, and saute it till it all starts coming together.
--->Now add the celery, mix once
--->Add the carrots, mix once. Add Salt
--->Transfer the contents to a Pressure Cooker and give it 3 whistles.
--->After the pressure comes down, take a hand blender and blend it all well.
--->In the pan you sauteed the veggies, add the butter and when it melts add the spice powders and mix well, now add the blended contents  and the broth to this. Mix well. Taste for Salt
---->Garnish with the Chopped (top part) Spring Onions and Cilantro

To make this thick and make it a one pot meal, I cooked some brown rice pasta  and served it together.

Sunday, October 7, 2012

Fried Rice with Veggies and Tofu

                                                                            Fried Rice


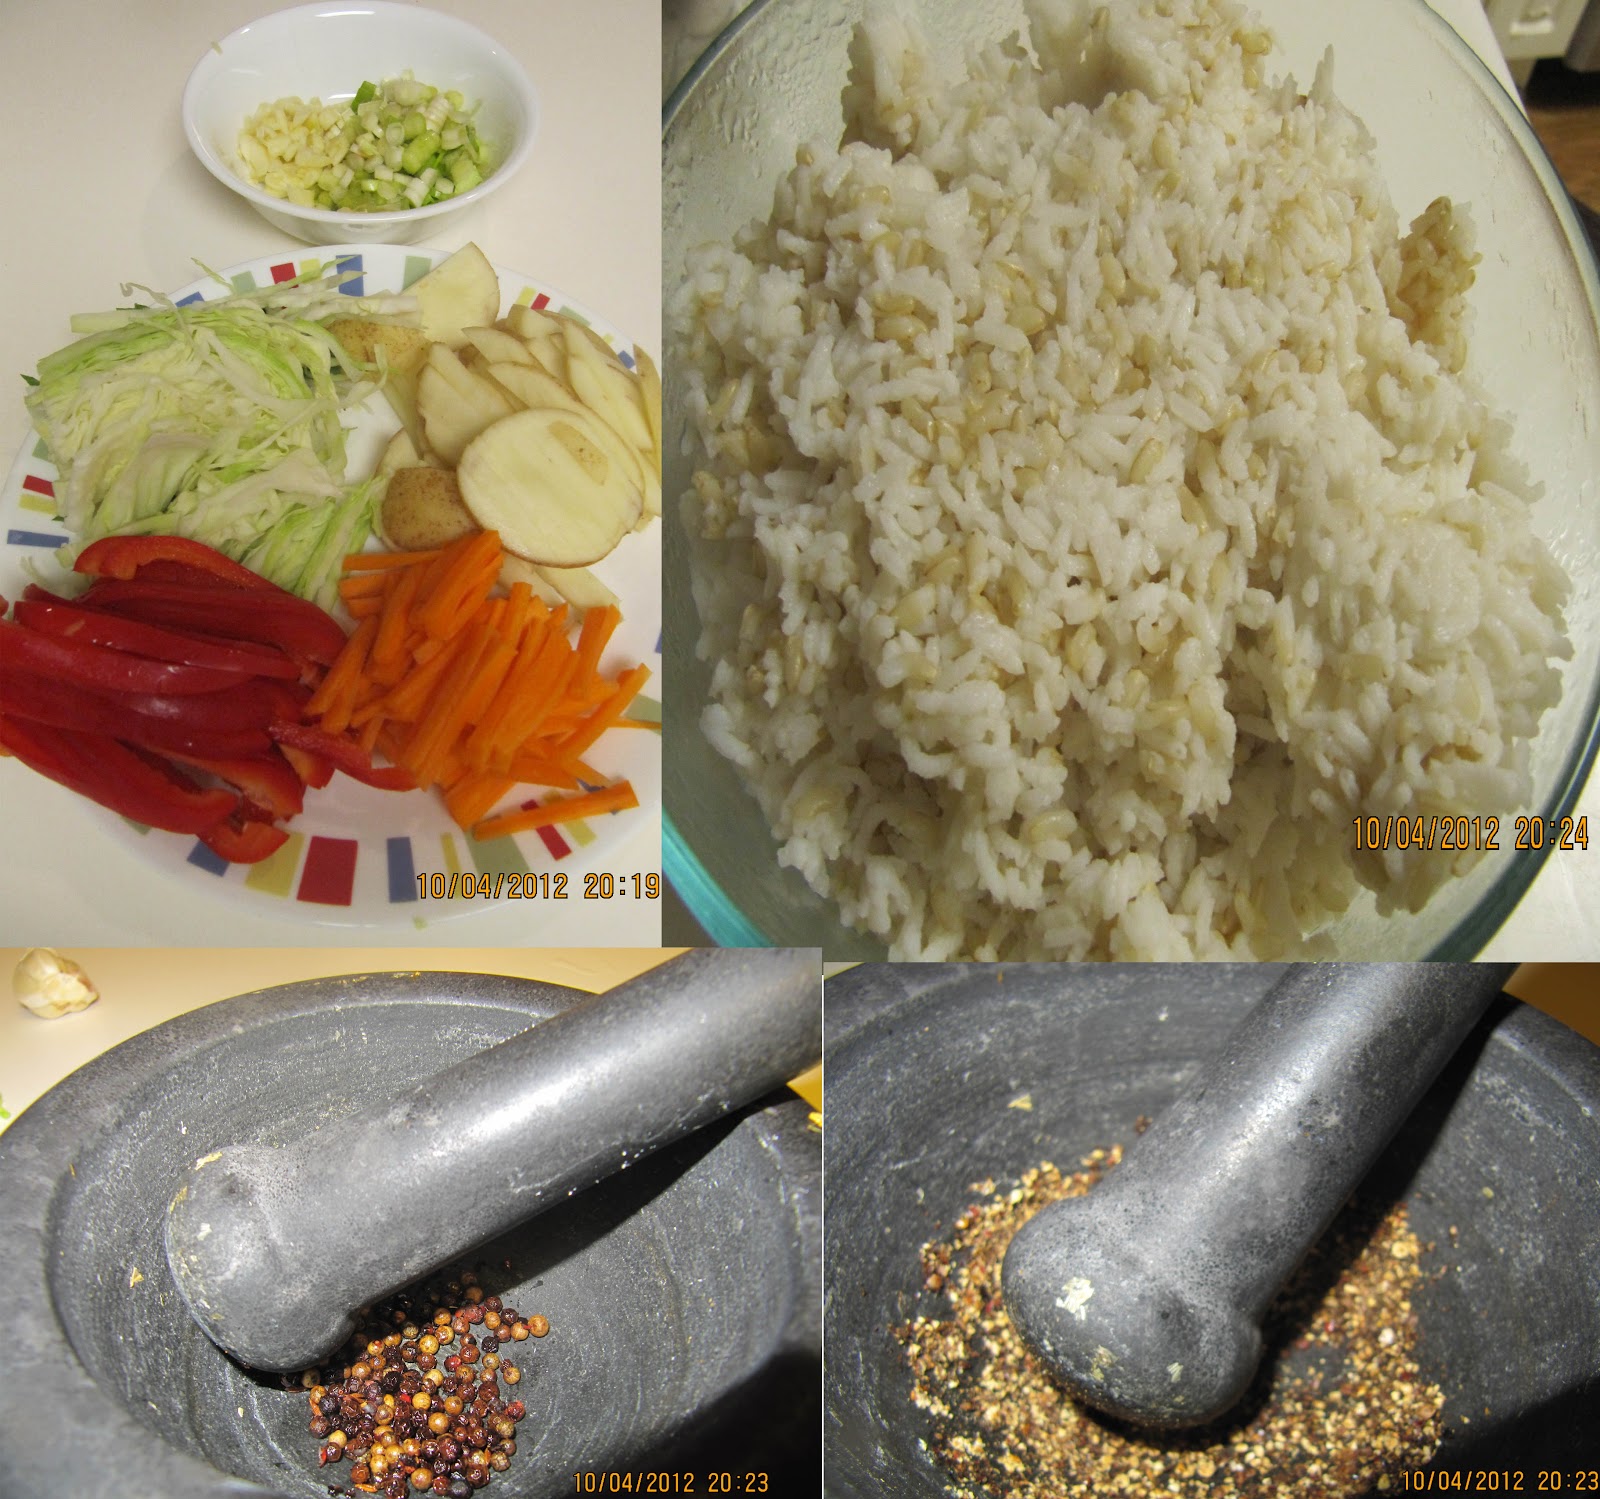
 I've always wanted to make the perfect fried rice, and one of the main things you need for that is cold, cooked rice. I usually don't have any leftover rice, so could never make it instantly. So I made the rice a day ahead of time, a first for me. I have used half brown rice and half Sona Masoori Rice. You can use any kind of rice, as long as you cook the grains separate. I mixed both the rices, and used 1:2 water ratio. I cooked it in a pressure cooker and after taking the rice out, let it cool in a tray for an hour and then put it in a container and put it in the fridge.

Fried Rice for 4 to 5 

Rice 1 and 1/2 Cups (Half Brown and Half Sona Masoori)
Tofu - 14oz  (Drained and cut in to square pieces)
Potato - 1 Large cut in to Strips
Cabbage - Cut in thin Strips
Red Bell Pepper -  Cut in thin Strips
Carrots -  Cut in thin Strips
Spring Onion - 1 Bunch (Cut in pieces, but reserve the top half separately for garnish)
Garlic - 7 to 8 Cloves Chopped in little pieces

Prep Work

 Oil - 5 Teaspoons
Soy Sauce - 2 Tablespoons
Ketchup - 2 Teaspoons
Black Pepper  1 Teaspoon (roasted and ground)
Salt to taste

Steps

---> (Medium flame)In a Pan, add 1 Tsp oil, and spread it evenly on the pan. Add the tofu pieces and sprinkle a bit of salt on them, and cook  them till they turn slightly brown.

Get all your items ready and be prepared to be at the stove for the next 12 to 15 minutes, for stirring the veggies, without leaving its side. Also you have to add a bit of salt each time you add every vegetable.
These times are given for the measurements given above, if you want to double the ingredients to feed a larger crowd, please remember to give the items a little extra time so all the veggies can cook perfectly.

---> In a thick bottomed pan, (Medium High Flame) Add the rest of the oil, add the garlic, roast them till they turn a little brown, add the spring onions, fry them for about 2 mins, add the potatoes, fry for about 3 to 4 mins, keep stirring, add the cabbage, and give it for about 3 mins, and then add the carrots and the bell pepper, and stir, and dont foget to add the salt each time you add a vegetable.

---> Check the veggies to see if they have cooked, especially the potato, and the rest can be a bit crunchy.

----> Once you have made sure the veggies have cooked, switch of the stove, and add the rice. When you add the rice, add by hand and kind of try to make the grains separate. They might be a little squishy since it was kept in the fridge. Add the Tofu, Black Pepper Powder, the soy sauce, the ketchup and salt for the rice.

----> Mix the rice, tofu, veggies and the sauces together. And start the stove again, and on a medium flame close the pan and let the items bled together for about 3 to 5 mins.

---> Garnish with the top half of the chopped Spring onions and serve.