Friday, October 1, 2010

Paneer Fingers


When ever I think about Paneer Fingers, I am reminded of this small fast food place in Chennai called ‘Dilli Haat’. (This has no connection to the Dilli Haat in Delhi).

When I lived (for one year) in Chennai with my kids in 2002, we used to frequent this place often.
 They closed it in 2003, after we left...

For people who know Chennai, it used to be inside the mall where Adyar Bakery is there on Luz Church Road, right next to Tulsi Silks. That was the one place where my kids would not get sick after eating Paneer in India. Anyways, after they closed I kept trying to make it myself at home, but still would not completely match the taste of theirs.
The Paneer fingers you get there will be crisp with a subtle taste of garlic and crispy on the outside and soft on the inside.
This post is a result of me trying to make the perfect Paneer finger and I   succeeded.My kids also approved this…..

You will need

Paneer (standard packet, you get in Indian Stores)
Ginger 1 inch Piece
Green Chili 2 (more if your kids like it spicier)
Garlic 4 cloves
Yogurt – 2 tablespoons
All Purpose flour – 3 Tablespoon
Turmeric Powder – 1/2 Teaspoon
Chili Powder – 1 Teaspoon
Salt – as needed
Paneer Fingers1

Method

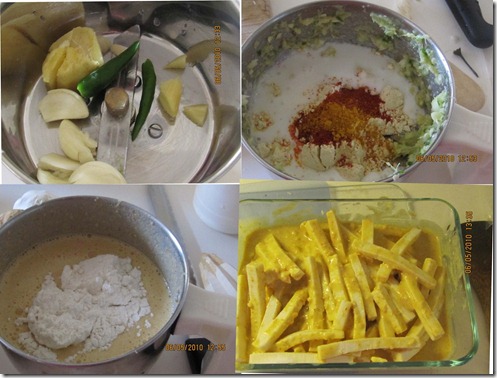
  1. Cut paneer in to desired shape for soaking in the marinade
  2. Grind the Green Chili, Garlic and Ginger to a smooth paste, to this add the yogurt and chili powder, salt and Turmeric powder, grind again.
  3. Add the All purpose flour to this and grind again, and pour in a flat dish so all paneer can get soaked well.
  4. Soak for half an Hour.

Paneer Fingers2
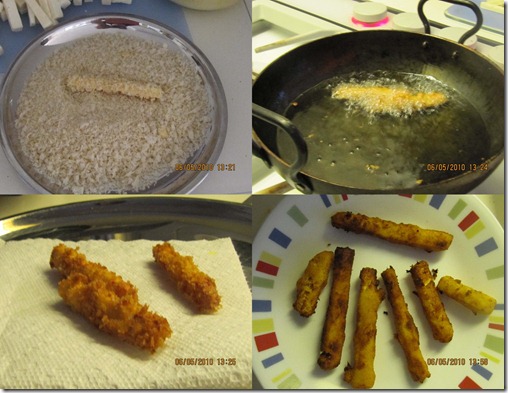
  1. Heat oil in a Kadai (a thick bottomed iron pan) on Medium flame.
  2. once the oil is hot, (test it by dropping a small piece of paneer, in to it, it should be a nice rich golden brown color, if it blackens the pil is too hot, reduce fire.)
  3. one by one, roll the paneer in Ground Panko Breadcrumbs and then drop in oil and fry to a golden brown color.
  4. Serve with Ketchup or Hot and Sweet Sauce… 
The first one was made with regular panko, it tasted good but still did not look like it, but then my husband ground the bread crumbs and it tasted and looked exactly like the one we used to get in Dilli Haat... !!
The only downside to this dish, is it gets over, before you bring it to the table.   :)

Thursday, September 23, 2010

How to make Avial (Steamed (Country) Vegetables in Yogurt Gravy)


It goes very well on its own, accompaniment to a good Vengaya Sambar (Onion Sambar),
or with Adai.....Shown here with Adai (my husband's Dream / Favorite combination)

Avial
This is one of the most easiest vegetable dish to make. Yet I have seen various versions of Avial in Hotels and
other places and had to write this post. The Tamilian (Tanjore Style) version of this dish really has only 3 Simple steps. The Avial which is traditionally made in my house is white and will have only country vegetables (naattu kaai) which means it wont have lima beans, corn, peas, or cauliflower. I have seen this made with the mixed frozen vegetables that are available here in the US and I feel the individuality of this dish is robbed.


The Vegetables you can use to make this are
Winter Melon (Vellai Poosanikkai)  (More of this)
Beans
Carrots
Cucumber
Chayote (Also known as Bengalore kathrikai or Chow Chow)
Snake Gourd
Guwar Beans (Cluster  Beans -- Available in Indian Stores)
Avaraikkai (Broad Beans -- Available in Indian Stores)
Green Raw Banana 
Raw Green Banana
Thick Stems of Spinach
Brinjal (Eggplant) (I really don't like to include this)
Indain Yam (Senai Kizhangu-- You don't get this in the USA)
Drum Stick (only frozen available in Indian Stores and they are not that good .. can do without this)
Steamed Taro Root (only if you really really want it, but the avial will become slimy)

And Absolute NO NO s are
Any kind of Onions, Tomatoes, Okra (Ladies Finger), cauliflower.

Potatoes and Indian Yam can be steamed separately and added.
As an option, potatoes can be peeled and cut and then steamed along with the other veggies.

This will feed a minimum of 8 people

You need
 All the Vegetables (about 8 cups)
Cumin -- 2 to 3 teaspoons
Fresh Grated Coconut --  1 cup (yes 1 cup)
Green Chili - 4 or 5 (or more if you can handle it)
Fresh Yogurt - (About 2 or 3 cups)
Salt as needed

Method
--->Grind Cumin, Coconut and Green Chillies to a smooth paste
--->Cut all the veggies. Make the pieces big but not too big that you have to open your mouth too wide to eat it... :)
--->Add the salt and Cover and Steam all the veggies with about 1 and 1/2 cups of water.
--->The veggies will let some water out.
--->After the veggies are cooked (when pressed with a fork it should easily get mashed) if you see there is excess water you can drain it, but a little excess is fine.
--->Mix the ground paste to this and boil for a few mins on a low heat.
--->Mix the yogurt to this and remove from fire as soon as the mixture gets warm and before the yogurt splits.

Traditionally there is no tempering of mustard seeds for this.
You can add some Coconut oil as an option, and some curry leaves as a garnish.

[If you notice, this is similar to this Mor kootu, except for mor kootu (made with one vegetable) is usually garnished with a tempering of Red Chili, Mustard and Curry Leaves.]


Mysorepak, Mysorepagu, or Mysorepa.... How do you make it??


Call it what you want but this is one of the easiest and trickiest Traditional  South Indian Sweets... 


Well,
Easiest because you can make it at short notice and
Trickiest because there is a 3 to 5 minute window, when you add the flour and if you miss it, you either end up with a goooeey mess which will stick to your mouth or a hard rock like substance for which you will have to use a hammer to break it.....
Before you get discouraged or lose heart, try my recipe once. I would suggest that you try this recipe with smaller amounts of everything.

I have had many versions of mysorepaks, (good and bad)
---The one you get in Krishna Sweets which is a famous Sweet Shop in Chennai, India (but it is a little too burnt for me).
---The one you get in weddings ( a little frothy on top and hard for me)

I know I am hard to please.... :)
But the one my mom used to make was just right, Her version was a nice rich yellow color, soft and was able to hold itself as a piece and also when you put it in your mouth, it would just melt soooo  easily.....
My Mother was an amazing cook and an expert in making this sweet and would make large quantities of this for Deepavali or if an unexpected guest visits... This recipe makes the same texture as her mysorepak. I always think about her when I  make this.... I make it a lot in my house, and it is one of my kids favorite sweets.

Another person I would like to mention is Late Mrs Ambujam Veeraraghavan, my friend Sabitha's Mother In law. She is the one who asked me to mix the ghee and the besan before hand, so as to make the process easier.


The basic measurements or ratio given in Meenakshi Ammal's book is
2 Cups Ghee: 2 Cups Sugar: 1 Cup (Chick Pea Flour).

(and 1/4 of the amount of sugar is the water you use to make the syrup.)

Please see this for the recipe of making the ghee yourself. Ghee is just clarified butter. You could buy it at an Indian Store, But it is not that had to make.

I  usually reduce the sugar to a little more than 1 and 1/2 cup. For this post I used 1 and 3/4th, but still it is a little too sugary for me and my family....

Chick Pea flour is also called Besan. You can find it at any Indian stores. You can also look for them as Garbanzo Bean Flour.
So if you want to try to make them reduce all the amounts, and start with the 1/8th cup of Flour, 1/4 cup of Ghee and 1/4 Cup of Sugar (or lesser, how you prefer).
Method:
Preparation--- Step 1:
---Take a tray, and spread a little ghee so that when you are ready to pour the cooked mixture, it should be able to lift off easily without sticking to the tray.
---Mix the Besan and the ghee. (the books don't mention this, they usually add it separately to the sugar) but this step makes it a little easier.
Step 1

 Step 2:
---> In a big (preferably nonstick) vessel, pour the sugar and  water and let boil on medium flame
for this above measurement you should be able to see the sugar dissolving in under 10 minutes and if you use a wooden spoon and take out some sugar you will be able to see a thread like consistency form the syrup on the spoon to the vessel.
This syrup consistency is the most important part, and really comes only with practice.
Another method is to drop a dollop of the syrup in a bowl of water and it should not dissolve.
Once you reach this consistency you should pour in your Flour and Ghee mixture in to this.

(This is the crucial step, cos if you put the mixture in too soon, you will end up with a gooeey consistency and too late it will be rock hard...)
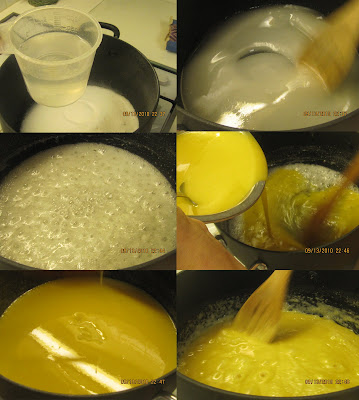
Step 2

Step 3
---> The mixture will start bubbling
---> Keep stirring it clockwise and anticlockwise as fast as you can, the goal is not let it stick to a side of the pan, it will burn and smell.
---> At one point the whole mixture will try to stick to the wooden spoon and become kind of frothy
---> At this time, slowly pour it out on to the tray you have smeared with ghee and flatten this on to the tray so you will get even sized pieces.
---> If you delay pouring it out on the tray, the mysore pak will become brown and also have a burnt smell.
 --->Let it Cool for a few minutes and then before it hardens, cut the pieces in to desired shapes with a sharp knife and remove and store. While its hot, leave the container open and when it is completely cooled, you can close the container... I guarantee that you will not sop with one piece..

(Wanted to add this as a side note, I made it again and reduced about two tablespoons from the 1 and 1/2 cups, and the sweetness was perfect for us.)
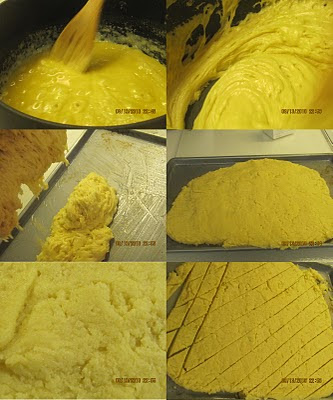
Step 3

Thursday, September 9, 2010

Mung Bean Sprout Salad - yet another version

This is a relatively simple salad. Easily serves 6 people.
You Need
Sprouted Mung Bean - 2 cups
Carrots - 4 or 5 Grated
Corn - 2 or 3 (grilled and rubbed with lemon and salt)

To see how you can make these sprouts read this.
Here is a look at my sprout maker.
Steam the Mung Bean sprouts with little water till they are slightly soft.
Let them cool.
Take the corn and remove all kernels and let cool.
Now bring the 3 of them together, and add a bit of salt and lemon juice and a teaspoon of olive oil and serve almost with anything...
I have added a bit of grated mangoes... to this but its optional....

Dal Makhani


This was taken just before garnishing.


This is a traditional North Indian Dish, I use the recipe from Nita Mehta's Mughlai Vegetarian Cook Book.
I love this recipe because it is fool proof, very nutritious, because of the black gram lentils. They are very high in protein.
I usually double the amounts said in the book, so I can use it for two meals. This recipe will feed a minimum of 8 to 10 people.
You Will Need
Whole Black Gram Dal - 2 cups
Split Channa Dal -- 4 Tablespoons
Kidney Beans - 4 Tablespoons (soaked for 5 to 6 hrs)
Ghee or Oil - 5-6 tablespoons
Water - 10 cups
Salt - 3 teaspoons or as needed.
Ginger - 2" piece
Garlic - 8 Cloves
Dry Red chillies - 4
Tomatoes - 8 (pureed) (I used 1 32 oz can of whole peeled tomatoes and pureed them with a hand blender)
Cream - 1/2 cup (optional)
Coriander Seeds Powder - 4 Teaspoons
Garam Masala - 1 teaspoons
Nutmeg - 1/2 Teaspoon
Butter - 2 Tablespoons (optional)
Dry Fenegreek Leaves (Kasoori Methi) - 4 Teaspoons
Method
--- Grind Ginger, Garlic and dry red chillies together to make a paste.
--- Clean and Wash dals, Pressure cook all dals with 1 teaspoon ghee, water, salt and half the ginger garlic paste.
--- After first whistle, keep on low flame for 40 minutes. Remove from fire and keep aside.
--- In another pan, Heat 3 tablespoon ghee, add the pureed tomatoes, and cook until ghee seperates and the tomato puree becomes thick.
--- Add the left over ginger paste, garam masala and coriander powder. Cook for a few seconds, add this tomato mixture to the boiled dal.
--- Add the butter (optional) and the dry fenugreek leaves to the dal and simmer for 15 minutes.
--- Add the cream (optional) and nutmeg powder. Mix and remove from Fire
Garnish with a bunch of Fresh Coriander leaves.
For added presentation you can make thick cream rings around the coriander and serve hot.

I have served it with slices of  fresh cucumber, Lassi, Cut Mango Pickle and Hot Rotis.

Wednesday, September 8, 2010

Pavakkai Pitlai ---- Bittergourd Gravy


This is a very traditional Dish... made with Bitter gourd. Even though the name sounds complicated it is basically a different version of sambar...

This recipe makes 10 servings. 
Macro Counts per servings of about 220 gms each - FAT 2.6 gms, Carbs 11.7 gms Protein 4 gms

I haven't added any peanuts to this, the macro counts will change if you add them.

You will need
Bitter gourd -- Sliced in half, seeds removed and sliced thinly in semi circle rounds-- about 4 cups (400 grams)
Oil - 3 teaspoons
Water- As needed (around 5 cups)
Tamarind - a lemon sized ball
Coriander Seeds - 3 to 4 tablespoons (30 gms)
Red Chillies - 10
Coconut - 30 gms
Channa Dal (Split and skinned Garbanzo Beans) - 25 gms
Turmeric Powder - 1/2 teaspoons
Salt - 2 to 3 teaspoons or as needed
Sambar Powder - as needed (recipe found here)

To Pressure Cook
150 g  Tuvar Dal (3/4 cup)
30 g Channa Dal (1/4 cup)(Optional, don't use if using peanuts or whole chickpeas)

 To garnish 
 Oil - 2 teaspoons
Mustard Seeds - 1 teaspoon
Curry Leaves - 1 strand
Red Chillies - 2 Teaspoons

Method

--- Soak the Tamarind in about 1 cups of warm water, after a few minutes squeeze tamarind and extract the juice.
--- In a Pan, add a teaspoon of oil, roast the Channa Dal and Coriander seeds, after they become slightly roasted, add the red chillies. Let it cool.
-- add some water and the coconut to this and grind to a smooth paste.
---  Add two teaspoons of oil and start by frying the bitter gourd, until they lose some of the bright green color.
--- Add the tamarind juice to it, the turmeric powder, sambar powder, salt and te rest of the water, let it come to a boil and let the bitter gourd cook completely.
--- Once the bitter gourd is cooked, (you should be able to break a slice in two with  a spoon easily).
--- add the ground paste to it and let it come to a boil.
--- Add the pressure cooked dal to this, and bring to a boil.
--- As an option you can add boiled chickpeas or boiled groundnuts to this,
--- For garnish, in a separate pan, add oil, then the mustard once that starts sputtering, add the red chillies and curry leaves and add it to the bitter gourd gravy while it is still sizzling....
--- fresh Coriander leaves can be added to this..

Serve with hot rice or hot rotis.....

Saturday, April 10, 2010

Red Bell Pepper Chutney குடைமிளகாய் சட்னி


I made this chutney for Golu 2009. It is a great accompaniment to Roti, Idli and Dosa...

To make about 2 cups of this chutney you will need 7 to 8 Red Bell Peppers,
I have used a mix of red, yellow and orange, If you use all red, then it will be in an even more darker shade of red.

7 to 8 Red Bell Peppers - chopped
Oil - 3 Tablespoons
Mustard - 1 Teaspoon
Red Chili - 5
Tamarind Paste - 1 teaspoon
Fenugreek - 1/2 teaspoon
Salt - as needed

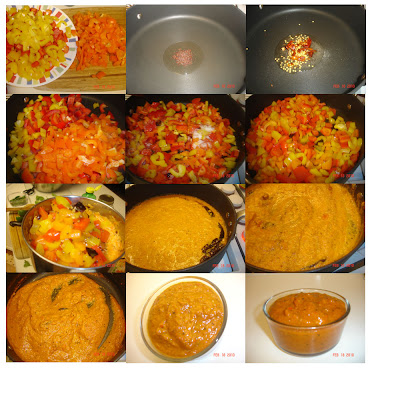
---> In an empty pan, (on a medium high flame) add 1 tbsp oil, and half of the mustard and once that sputters add 3 red chili to it an then the fenugreek.
---> Add the chopped bell pepper to it and start to saute it lightly
---> add the salt to it, and keep sauteing it,, it will shed some water and wilt
---> At this point, switch off the stove and let cool
---> In your mixer, grind this to a smooth paste
---> In the same kadai, (agian on a mediyum high flame) add the rest of the oil, and the mustard and once that sputters add red chilies, and then add this paste to the pan and mix well and cover the pan, (it will start to bubble)
---> After two minutes, mix in the tamarind paste and taste for salt
---> Cover the pan again and let this be simmering on a low to medium flame for about 5 to 7 minutes
---> The color this chutney will darken a bit.
---> Let cool and keep in a dry container

This will last for a month in the fridge (i bet you will finish this faster) as long as you don't use a wet spoon.

Friday, April 9, 2010

Kids Lunch 3


I have to say, I dont make this for lunch very often....
but I do try once in a while,
here it is sevai and one clementine.... :)

Kids Lunch 2


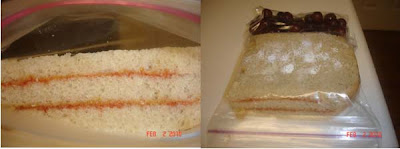
This is a regular PBJ (peanut butter jelly) sandwich.

I make my own bread, and I usually mix some melted unsalted butter with peanut butter and make the sandwich. And for the Jelly I use Kissan mixed fruit jam from the Indian store.
My kids prefer my PBJ than the school's.

I make a triple decker for my son and a regular one for my daughter.
Here it is pictured with some black grapes.

Kids Lunch - 1


So many people, ask me what I pack for my kids, I will post it under this tab....
This is a sub I make for my kids, I have used a Hoagie bun, to make this sub.

For my son, (he hates tomatoes) I have sliced the Hoagie, and added lettuce, cheese, onions and a veggie burger (i buy this from Trader Joe's, its called potato burger with Indian spices, you have to thaw it and make it hot on a tawa and cut in equal sizes).

For my daughter (she loves tomatoes), I just arranged tomatoes and olives on a bed of cheese and lettuce.

I usually wrap it in a plastic wrap and give it with a side of juice or chips.

Hing / Perungayam

In response to My Hing Post, A reader of my blog told me an easier way to break the hing. She had said that if you put it in a box and cover it tightly, it will be easier to pinch it.
I tried it and didn't work, my aunt taught me another way, to just put it in the microwave for about 30 to 40 seconds, it becomes very airy and then you can powder it very easily.

Sweet Potato Dry Curry

Sweet Potato is low in glycemic index and is rich in vitamin a. Please read this and this to know more about this vegetable.
This is one way to include this in your diet. This goes very well with rotis or brown rice.
For a family of 4, you will need about 7 to 8.
In a large pan, boil some water, and once it has reached a boiling point, add the sweet potatoes to it.
Let it cook for 15 minutes
Once it is cooked, remove and let cool, and peel the skin and cut in cubes.
In a pan, add some oil, add mustard seeds,
and once it sputters, add curry leaves, coriander leaves, chopped green chillies, red chillies to it and then add the cubed sweet potatoes to it, and sprinkle salt and mix everything.
Serve Hot.

Ilai Vadam

Ilai Vadam!! Ilai means leaf and Vadam means the dry papad like item, which u have to fry in hot oil,
But in our house, we make ilai vadam to eat like a snack...
it is hard work but, the end result is just amazing...

To make 40 to 50 ilai vadams, it will take 3 hrs (more or less).. if you want, you can resist eating them and let them dry and then deep fry them and enjoy them..

You need
Idli Rice ---- 1 Cup
Salt---- as needed
Ajwain (Omam in Tamil) - 1/4th teaspoon
Water --- as needed

---->Soak the Idli rice for 3 to 4 hours
----> Grind to a smooth fine paste and let ferment for 2 days
---->On the third day, you can smell the dough and it will smell a little sour
---->At this point, you add the salt and ajwain to it and add enough water so that when you try to pour some on a plate, it doesnt run too much ....
--->Assemble your steaming equipment, i have used a kadai, a ring, and three stainless steel plates with oil on them, you will also need a lid
---->alternatively you can use a ilai vadam steamer, if you are lucky to have one.... (I have heard my great grandma used to own one and it could do about 15 vadams in one take... )--
---> Add some water to the kadai and keep on a medium high flame, and let it come to a boil
---->now start pouring one ladleful dough on the oiled plate and place the plate on it
---> in about 45 seconds it should have cooked and you should be able to roll it out of the plate easily
--->now repeat the process agian and again and again (you get the point)
--->The dough should be in a good consistency (not very watery and not very thick)

Some of the ilai vadam posts i liked are this and this!!!


My sister, cousins and myself enjoy this sooooo much... and just thinking of the days when i would come back from school and find a stack of ilai vadams waiting for me on the table, makes me so happy...... must have taken my mom hours to do that....

Saturday, February 20, 2010

Cranberry Pickle (Thokku)

I know Cranberries are not in season now, but when it comes again, you can make this pickle.

You will need

Cranberries - 2 Bags
Gingelly Oil - 4Tablespoons
Mustard seeds- 1 Teaspoon
Red Chili - 3 or 4
Red Chili Powder or Pickle Powder - 1/4th of the amount of Cranberry Paste
Salt - 1/4th of the amount of Chili Powder
Hing -
1/4th of the amount of Salt

To make the Pickle
---> Wash the cranberries well in water and take out the ones which are squished.
---> Drain and Pat them dry
---> In a heavy bottomed pan, (on a medium flame) add 1 Tablespoon oil and put the cranberries in, it will start to burst and become squishy in under 5 minutes
--->Mash them with a wooden spoon and switch the stove off.
--->Let them cool and once they are cool, transfer them to a mixer and make a paste.
--->In the same pan, add the rest of the oil and add the mustard seeds and red chillies
--->Once the start bursting, add the cranberry paste, add the turmeric powder and Pickle powder and mix well.
--->Cover the pan and let it all cook together on a small to medium flame for about 5 to 10minutes, until the color of the paste darkens
--->Let cool and transfer to a dry container.

Goes well with Bread, Dosa, Adai, Curd Rice, Chapathi etc..

Grilled Sweet Potato Slices

Grilled Sweet Potatoes!
I ate this in Whole Foods! I usually am very picky about eating samples in stores! But I saw her making this in front of me on a very clean grill.... so I tried one and another and so on....
This is by far the simplest appetizer you can make with less than 5 ingredients..
You need
Sweet Potatoes -- Sliced in thin slices
Oil - to brush over the Griddle
Salt and Pepper - Mixed

all you do is slice the potatoes and place them on an oil brushed griddle or skillet and roast on a very medium fire until it browns a bit on both sides and sprinkle salt and pepper and eat...
You can never stop at one.

How to make Poli? (Puran Poli)(A Soft bread with a sweet Filling)

POLI

Even though it feels like a lot of steps, trust me the end result is worth it!

You Need:
To make the Dough:
2 cups of Maida
3/4cups of whole wheat flour,
a pinch of Turmeric Powder
1 and 1/2 tablespoons oil.

To Make the Pooranam:
1 and 1/2 cups of Channa Dal
1 and 1/2 cups of Jaggery
2 Handfuls of Shredded Coconut
2 Tablespoons Ghee
1 Tsp Elaichi Powder


Poli is usually made on the last day of the Tamizh Month Maarkazhi.
That day is called "Bhogi". This is when you get rid of all the old things in the house, clean the house..kind of like spring cleaning ....


I was not really great in making this since I always would try and make it like a Paratha..
So I called in the Poli Expert, my sis in law Bhairavi, to help me.
Here is how she does it....

To make the dough:
She usually makes the dough a few hours in advance so it helps it to stretch well.
To make about 18 Polis she used about 2 cups of Maida and about 3/4cups of whole wheat flour, a pinch of Turmeric Powder and about 1 and 1/2 tablespoons oil.
She made the dough by hand and made it into a nice ball.


Here is dough she will use a few hours later.....


To make the Pooranam (filling)

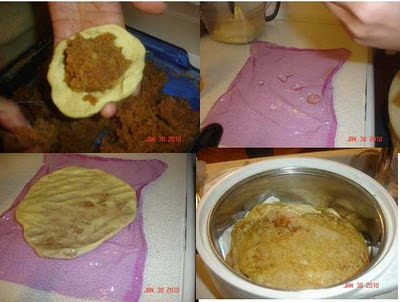
As you can see Step by step
----> Roast about 1 and 1/2 cups of Channa Dal until you can smell it and it turns in to a rose color.
---> Pressure cook it in the cooker and you may add little water.
---> Once it cools down, put this in a food processor and add about 2 handfuls of shredded coconut (optional) to this and grind to a smooth paste.
---> It has to be smooth and creamy before you proceed.
---> Transfer to a microwave safe bowl and add jaggery to this.
---> Put this in the microwave for 3 minutes at a time until you get to the point where the jaggery has completely melted and has incorporated in to the channa dal mixture
(look at the last picture)
---> You can add some ghee and Elaichi(Optional) to this and make it smell nice..


And then you proceed to make the Poli,

Pinch off a small piece of dough and stuff with pooranam (The pooranam amount should equal two times of the dough) and cover completely with the dough and proceed to flatten it with your fingers and roast on a tawa and you can eat Hot Polis
(Optional) you may add some ghee once it is cooked on one side before you turn it over....

Enjoy!!

Sunflower Seeds!

The seeds in the picture are Sunflower Seeds.
Bee from Jugalbandi guessed it right!
These are with the Shells. More info on them can be read here.

Wednesday, January 27, 2010

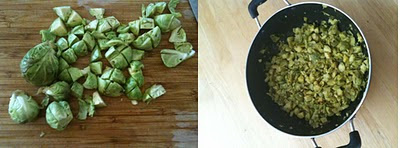
Brussel Sprouts Curry


Brussel Sprouts are very low in calories. More info and nutrition facts on them can be read here.
Here is where you can read about How to clean it.

These Brussel sprouts are from Seattle!

I use Brussel Sprouts in a Kootu Style (with dal ) more than in dry curry. This is because it has a smell which is very obvious in the curry than in the kootu.

All you have to do is cut them and steam them with a little salt, and give a tadka of mustard, red chillies and Curry leaves.

To make Kootu, just take any kootu recipe from here and replace the veggie with Brussel Sprouts.

Wednesday, January 20, 2010

My Perima's Blog

This is my Perima's (My mom's elder sister) blog.

http://vijidiary.blogspot.com/

Viji Perima is very creative and very entertaining. She has written poetry and stories in Tamil and Telugu. You can spend hours talking to her, without realizing the time.
This blog is written in tamil.

So if you know to read tamil, go ahead and enjoy!!

Tuesday, January 19, 2010

Vegetables from Seattle


My Sister got all these veggies from Seattle from a local CSA she is part of.
They were so tasty...
I made a whole bunch of things with these.
I will post each item..

Saturday, January 9, 2010

Tomatillo Pickle

Tomatillos are green in color. More info on them can be found on them here.

Pickles made out of them are more tastier then the one made with tomatoes.

Follow the same recipe as for tomato pickle...

Paneer

This is a very easy side dish to make. Children will love it since its paneer and also very crispy.
You have to make this just before you eat since, if left after made for some time, it will lose its crispiness...
you need
Paneer - 1 Packet
Oil - 1 Teaspoon
Lahori Fish Masala - 1 teaspoon
Cumin - 1 teaspoon
Salt - as needed
---> Spread the oil on a non stick pan and place on a medium flame.
---> Add the cumin to the oil.
---> Cut the paneer in desired shape and arrange on a non stick pan
---> Roast the paneer till its lightly browned on both sides
---> Add the masala powder and coat all the paneer with it
---> Once it is nicely browned, keep in a serving pan.

Serve this with hot rotis. Here I have served it with Butternut Squash soup.

Tofu with Thecha

This is another way to make tofu. Here I have made it with Thecha.
You will need
Tofu - 1 packet
Oil - 1 Teaspoon
Thecha- 1 Teaspoon

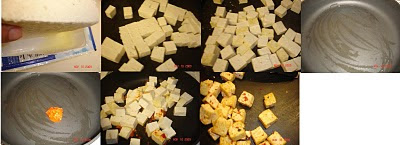
---> Drain the Tofu
---> Cut in desired shapes
---> In a nonstick pan, spread the oil and add the tofu to it.
---> This should be made on a medium flame.
---> Once the Tofu is slightly brown on one side and turn it over
---> Keep the tofu aside and add the thecha to the empty pan and mix it with the browned tofu and keep on stove for some more time.
---> Serve hot with rotis.

Cumin and Pepper Rasam with Vadaam (milagu jeeraga rasam)


This rasam is usually made when someone in the house is suffering from cold or fever.
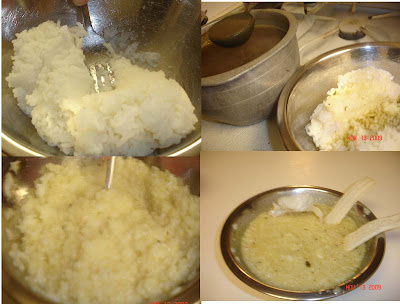
It is made and then mixed with some hot mashed rice and made very soupy so as to soothe the throat..
You will need
Water- 4 cups
Tamrind - a tiny ball size of 1inch diameter
Salt - as needed
Cumin - 1 teaspoon
Pepper - 1/2 teaspoon
Ghee - 1 teaspoon
Mustard - 1/2 teaspoon
Red chilli - 1 (optional)
Curry Leaves - 6 or 7

---> Take the tamarind and soak it in 1 cup of water.
---> In another pan, dry roast the cumin and pepper till you smell them
---> Let cool and make in to a powder
---> When the tamarind is soaked, squeeze it well and pour the water in the vessel in which you plan to make the rasam and add the powder to it also, as well as the salt
---> Boil this in a medium flame and once it reaches a rolling boil add the rest of the water to it
---> Give tadka to this with ghee, mustard and the red chili and curry leaves

To eat this add the rasam to hot mashed rice. It helps if the rice is soft and mushy ...
a Close up of Vadam. These are rice wafers and tapioca wafers, deep fried in hot oil.
The first picture is of a vadam floating in rasam...

Cream Cheese Appetizer

For my daughter's birthday, My Sis In Law Bhairavi, assembled this wonderful appetizer.
She placed a bar of cream cheese on a flat platter and poured some cranberry glaze over that, and topped it with some crushed walnuts and some lemon rind.
She placed some wheat cracers to eat with it.
It is a very easy appetizer to make and very tasty too.


Friday, January 8, 2010

Lunch Menu

Happy New Year to everyone!!
Hope everyone had a good vacation.
Sorry for not updating the blog in a long time....
This is a picture of the lunch I had made for a few guests we had over the thanksgiving weekend.
The menu was
Upma Kozhukattai
Brinjal Kothsu

Sambar
Rasam
Long Beans Curry
Chow chow Kootu
Taro Root Roast
Sundal