Wednesday, June 22, 2011

Arisi Upma --- Broken Rice Upma

This is almost the same as Upma Kozhukattai

You can follow the recipe until you add water to the ingredients and then continue to cook it until it cooks fully. My mom would keep the stove on a low fire and let it roast underneath to create a crisp layer. It is called an adai, not to be confused with the other adai (lentil dosa). I had this for lunch with some Rasathu Vandal, another Awesome Combination.

Maple Syrup Buttermilk Bread


I have been baking bread since I bought my Zojirushi bread maker in Jan 2004. Most of my friends who own a bread maker, warned me that, even though they bought one, it ended up in storage, cos something or the other wouldn't work out and they end up buying bread again. To tell the truth, I have bought store bread once in the last 7 years, and my family hated it. I still buy bread for Pav bhaji and an occasional french bread, but for the sandwiches I make for my kids and the toasts, it is all homemade  bread. Once you try this, I am sure you will  agree and hopefully enjoy baking as much as I do.

Homemade bread also does not have any addtives or preservatives.

   I think I have mentioned this book in my previous blog posts, The Bread Lovers Bread Machine Cookbook.  There are tons of recipes in the book, and this recipe is one our family favorites.

About Maple syrup, I use the original maple syrup, not maple flavored corn syrup. This makes a huge difference in the taste. And always use Grade B for Baking, remember B for Baking. Grade A is used as an accompaniment to waffles etc. A is for Amber, it is generally lighter in color.
About Bread Flour, It is not all purpose flour. I use King Arthur Brand Bread Flour, available in most stores in the USA. I also mix in White Wheat Flour. The ratio I like to use is a 1/2 wheat 1/2 white or 1/3 wheat and 2/3 white, depending on the recipe.
About Gluten, it is basically wheat flour, which is found in the innermost part of the grain and has a higher protein level. This can be brought wholesale from amazon store and can be kept in freezer for a year.
If you have a bread machine, and plan to bake this in that,  please use the exact measurements and try not to  substitute any ingredients.
If baking by hand, you can substitute some, but make sure you have a really sturdy ball of dough, it shouldn't be loose or very dry. (use a regular loaf pan for this).
About Salt, I prefer to use Sea Salt for baking. I buy mine from Costco.
About Yeast, I use the SAF brand, I buy it from amazon, and store it in the freezer. If you become a regular baker like me (an average of two loaves a week) this will come for 6 months.


For a 1 and 1/2 pound loaf.
Water                              1 cup + 1 Tbsp
Unsalted Melted Butter     1 and 1/2 Tbsp
Maple Syrup                     3 Tbsp
Bread Flour                       3 cups or Bread Flour 2 cups and white Wheat Flour 1 cup (healthier)
Dry Buttermilk powder      1/3 cup (if baking by hand, u can use real buttermilk and add in little extra flour)
Gluten                                1 Tbsp
Salt                                    1 and 1/2 Tsp
Yeast                                  1 and 3/4th Tsp


If baking by Machine, just add all ingredients in the same order and set the machine to a regular loaf setting according to your machine instructions.

If baking by hand, u can substitute the real buttermilk for the powder.  and make a nice sturdy dough and knead for at least 20 minutes. Roll in to a loaf shape and in a oil sprayed loaf pan, place the dough.
 For added effect, you can just sprinkle some oatmeal on top.
Other variations can be adding some flax seeds or sunflower seeds or kneading them directly in to the dough also works...and let rise for at least 45 minutes.
Once the dough has doubled in size, preheat the oven to 350 Deg F, and let it bake for 45 minutes.
After it has baked, you can check the temperature of the bread, it should register 200 Deg F, which means it has cooked all through.

This makes a really good french toast bread.


Tuesday, April 19, 2011

Golu 2010

This post was meant to be published in October 2010!!
As usual I did have two parties and the menu was almost the same for both the parties....

Menu on Day 1

Javvarisi (sabudana) Payasam
Neer Mor (Diluted Buttermilk)
Microwave Aplams
Potato chips (bought)
Idli
Sambar
Coconut Chutney
Red Bell Pepper Chutney
Gun Powder mixed with oil
Spinach Rice
Lemon Rice
Potato Curry
Avial
Chapathi (catered)
Panner with Bell Pepper
Eggplant and Peanut Gravy


Menu on Day2

Javvarisi (sabudana) Payasam
Neer Mor (Diluted Buttermilk)
Microwave Aplams
Potato chips (bought)
Idli
Kanjeevaram Idli
Sambar
Coconut Chutney
Red Bell Pepper Chutney
Gun Powder mixed with oil
Vathakuzhambu Sadham

Potato Curry
Avial
  

I had a lot of help from my friends and neighbors, Madhu, Suman, Priya, and my sister in law Bairavi.......
It would have been impossible, if not for all of them...


Golu


  and Sophie --- upset because we left her in doggie day care for a day due to Golu!!


Friday, January 28, 2011

Palak Wadi ---- Healthy (Iron Rich )Green Squares

                                     Collard Greens Wadi
I learnt this from my friend's (Priya) mom, Mrs.Anjali Ambekar. Traditionally this is made with Spinach. My cousin Aparna gave me two big bunches of Collard Greens, which she got for under a dollar, back in November I think. This was the first thing which came to my mind. Even though it is time consuming, it is worth it. It is essentially a finger food, can be had as an appetizer or as a side to Rotis or Pulav.
For an appetizer, Maggi Hot and Sweet Sauce tastes great with it. It can be made ahead of time. It also freezes well too. This tastes best with Spinach, but since I had collard greens, made it with that.
  Please try this with Spinach, for best results...                      
Collard Greens Wadi

                                                               
                                                              Step  by Step Photos

You will need
 One Bunch Collard Greens (which will amount to approximately 8 cups of greens)
Gram Flour - 1 and 1/2 cups
Rice Flour - 3/4th cup
Salt - 3 teaspoons (more or less, as you may need)
Chili Powder - 4 Teaspoons )more if you can handle spice)
Coriander Powder - 3 Tablespoons
Haldi Powder - 2  Teaspoons
 Oil -- 3 to 4 teaspoons
Red Chili - 2 or 3
Urad Dal - 2 Teaspoons
-----> Wash and drain the collard greens and pat dry.
-----> Chop them in to small strips and keep in a big bowl.
----->  Run them through the food processor once, if you feel the pieces are all too big.
------> Add all the spices to this along with the flour and start to mix with your hand, the mixture should be dry but still bind together.
-----> In a flat vessel, put some oil and spread it all around so the mixture wont stick to the bottom
------> Place this in a steamer and steam for 15 minutes.
------> Let cool and then cut in squares
------> put these squares on a flat pan and grill them lightly so they get a bit roasted on both sides
------> Put the roasted squares in a serving bowl or a box if you plan to serve them later
When you are ready to serve, heat the squares first and then
------> In a dry Kadai, add oil, and when it gets hot, add the mustard seeds, red chili and urad dal
------> When the dal gets roasted pour it over tge warm squares...
Enjoy!!!

Happy 2011

Wanted to wish all my readers a very Happy New Year...

I wanted to apologize for not being prompt about posting entries...I have so many dishes that I want to post but really couldnt  because of the lack of time. I intend to post more recipes this year.

We made a new addition to our family! Sophie aka SoppiKannu

We got her in July of 2010 and she is one of the best decisions we made...


Sophie in December 2010, 9 months old
 We adopted her from a shelter in Charlotte and she is one of the reasons that I have not been posting any new recipes... We think she is a mix of Rhodesian Ridgeback and German Shephered.

Now that she is little over 10 months old, I hope to have more time to post entries on this blog...


Friday, October 1, 2010

Paneer Fingers


When ever I think about Paneer Fingers, I am reminded of this small fast food place in Chennai called ‘Dilli Haat’. (This has no connection to the Dilli Haat in Delhi).

When I lived (for one year) in Chennai with my kids in 2002, we used to frequent this place often.
 They closed it in 2003, after we left...

For people who know Chennai, it used to be inside the mall where Adyar Bakery is there on Luz Church Road, right next to Tulsi Silks. That was the one place where my kids would not get sick after eating Paneer in India. Anyways, after they closed I kept trying to make it myself at home, but still would not completely match the taste of theirs.
The Paneer fingers you get there will be crisp with a subtle taste of garlic and crispy on the outside and soft on the inside.
This post is a result of me trying to make the perfect Paneer finger and I   succeeded.My kids also approved this…..

You will need

Paneer (standard packet, you get in Indian Stores)
Ginger 1 inch Piece
Green Chili 2 (more if your kids like it spicier)
Garlic 4 cloves
Yogurt – 2 tablespoons
All Purpose flour – 3 Tablespoon
Turmeric Powder – 1/2 Teaspoon
Chili Powder – 1 Teaspoon
Salt – as needed
Paneer Fingers1

Method

  1. Cut paneer in to desired shape for soaking in the marinade
  2. Grind the Green Chili, Garlic and Ginger to a smooth paste, to this add the yogurt and chili powder, salt and Turmeric powder, grind again.
  3. Add the All purpose flour to this and grind again, and pour in a flat dish so all paneer can get soaked well.
  4. Soak for half an Hour.

Paneer Fingers2
  1. Heat oil in a Kadai (a thick bottomed iron pan) on Medium flame.
  2. once the oil is hot, (test it by dropping a small piece of paneer, in to it, it should be a nice rich golden brown color, if it blackens the pil is too hot, reduce fire.)
  3. one by one, roll the paneer in Ground Panko Breadcrumbs and then drop in oil and fry to a golden brown color.
  4. Serve with Ketchup or Hot and Sweet Sauce… 
The first one was made with regular panko, it tasted good but still did not look like it, but then my husband ground the bread crumbs and it tasted and looked exactly like the one we used to get in Dilli Haat... !!
The only downside to this dish, is it gets over, before you bring it to the table.   :)

Thursday, September 23, 2010

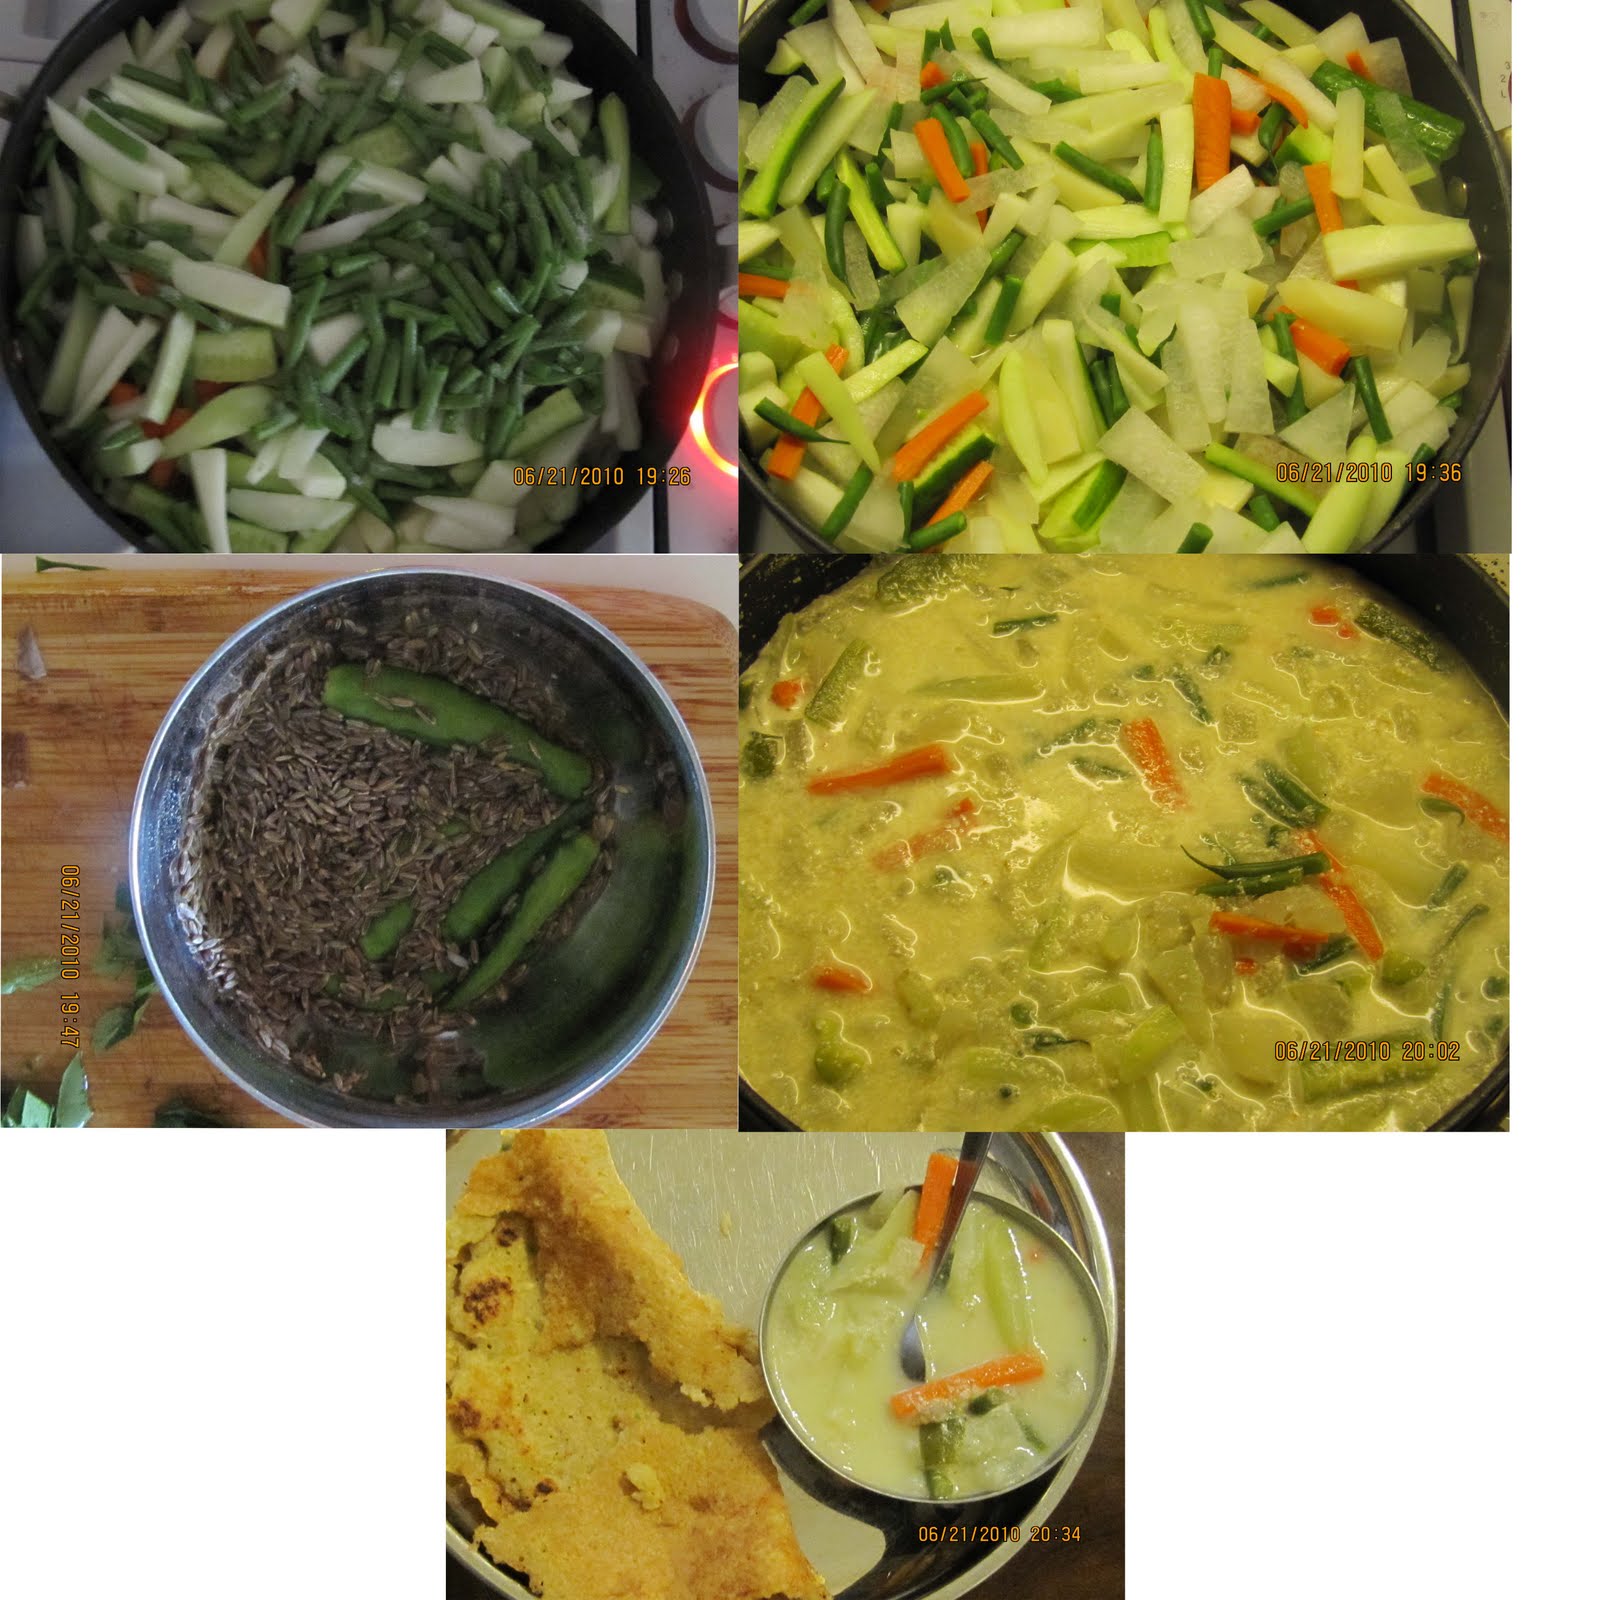
How to make Avial (Steamed (Country) Vegetables in Yogurt Gravy)


It goes very well on its own, accompaniment to a good Vengaya Sambar (Onion Sambar),
or with Adai.....Shown here with Adai (my husband's Dream / Favorite combination)

Avial
This is one of the most easiest vegetable dish to make. Yet I have seen various versions of Avial in Hotels and
other places and had to write this post. The Tamilian (Tanjore Style) version of this dish really has only 3 Simple steps. The Avial which is traditionally made in my house is white and will have only country vegetables (naattu kaai) which means it wont have lima beans, corn, peas, or cauliflower. I have seen this made with the mixed frozen vegetables that are available here in the US and I feel the individuality of this dish is robbed.


The Vegetables you can use to make this are
Winter Melon (Vellai Poosanikkai)  (More of this)
Beans
Carrots
Cucumber
Chayote (Also known as Bengalore kathrikai or Chow Chow)
Snake Gourd
Guwar Beans (Cluster  Beans -- Available in Indian Stores)
Avaraikkai (Broad Beans -- Available in Indian Stores)
Green Raw Banana 
Raw Green Banana
Thick Stems of Spinach
Brinjal (Eggplant) (I really don't like to include this)
Indain Yam (Senai Kizhangu-- You don't get this in the USA)
Drum Stick (only frozen available in Indian Stores and they are not that good .. can do without this)
Steamed Taro Root (only if you really really want it, but the avial will become slimy)

And Absolute NO NO s are
Any kind of Onions, Tomatoes, Okra (Ladies Finger), cauliflower.

Potatoes and Indian Yam can be steamed separately and added.
As an option, potatoes can be peeled and cut and then steamed along with the other veggies.

This will feed a minimum of 8 people

You need
 All the Vegetables (about 8 cups)
Cumin -- 2 to 3 teaspoons
Fresh Grated Coconut --  1 cup (yes 1 cup)
Green Chili - 4 or 5 (or more if you can handle it)
Fresh Yogurt - (About 2 or 3 cups)
Salt as needed

Method
--->Grind Cumin, Coconut and Green Chillies to a smooth paste
--->Cut all the veggies. Make the pieces big but not too big that you have to open your mouth too wide to eat it... :)
--->Add the salt and Cover and Steam all the veggies with about 1 and 1/2 cups of water.
--->The veggies will let some water out.
--->After the veggies are cooked (when pressed with a fork it should easily get mashed) if you see there is excess water you can drain it, but a little excess is fine.
--->Mix the ground paste to this and boil for a few mins on a low heat.
--->Mix the yogurt to this and remove from fire as soon as the mixture gets warm and before the yogurt splits.

Traditionally there is no tempering of mustard seeds for this.
You can add some Coconut oil as an option, and some curry leaves as a garnish.

[If you notice, this is similar to this Mor kootu, except for mor kootu (made with one vegetable) is usually garnished with a tempering of Red Chili, Mustard and Curry Leaves.]


Mysorepak, Mysorepagu, or Mysorepa.... How do you make it??


Call it what you want but this is one of the easiest and trickiest Traditional  South Indian Sweets... 


Well,
Easiest because you can make it at short notice and
Trickiest because there is a 3 to 5 minute window, when you add the flour and if you miss it, you either end up with a goooeey mess which will stick to your mouth or a hard rock like substance for which you will have to use a hammer to break it.....
Before you get discouraged or lose heart, try my recipe once. I would suggest that you try this recipe with smaller amounts of everything.

I have had many versions of mysorepaks, (good and bad)
---The one you get in Krishna Sweets which is a famous Sweet Shop in Chennai, India (but it is a little too burnt for me).
---The one you get in weddings ( a little frothy on top and hard for me)

I know I am hard to please.... :)
But the one my mom used to make was just right, Her version was a nice rich yellow color, soft and was able to hold itself as a piece and also when you put it in your mouth, it would just melt soooo  easily.....
My Mother was an amazing cook and an expert in making this sweet and would make large quantities of this for Deepavali or if an unexpected guest visits... This recipe makes the same texture as her mysorepak. I always think about her when I  make this.... I make it a lot in my house, and it is one of my kids favorite sweets.

Another person I would like to mention is Late Mrs Ambujam Veeraraghavan, my friend Sabitha's Mother In law. She is the one who asked me to mix the ghee and the besan before hand, so as to make the process easier.


The basic measurements or ratio given in Meenakshi Ammal's book is
2 Cups Ghee: 2 Cups Sugar: 1 Cup (Chick Pea Flour).

(and 1/4 of the amount of sugar is the water you use to make the syrup.)

Please see this for the recipe of making the ghee yourself. Ghee is just clarified butter. You could buy it at an Indian Store, But it is not that had to make.

I  usually reduce the sugar to a little more than 1 and 1/2 cup. For this post I used 1 and 3/4th, but still it is a little too sugary for me and my family....

Chick Pea flour is also called Besan. You can find it at any Indian stores. You can also look for them as Garbanzo Bean Flour.
So if you want to try to make them reduce all the amounts, and start with the 1/8th cup of Flour, 1/4 cup of Ghee and 1/4 Cup of Sugar (or lesser, how you prefer).
Method:
Preparation--- Step 1:
---Take a tray, and spread a little ghee so that when you are ready to pour the cooked mixture, it should be able to lift off easily without sticking to the tray.
---Mix the Besan and the ghee. (the books don't mention this, they usually add it separately to the sugar) but this step makes it a little easier.
Step 1

 Step 2:
---> In a big (preferably nonstick) vessel, pour the sugar and  water and let boil on medium flame
for this above measurement you should be able to see the sugar dissolving in under 10 minutes and if you use a wooden spoon and take out some sugar you will be able to see a thread like consistency form the syrup on the spoon to the vessel.
This syrup consistency is the most important part, and really comes only with practice.
Another method is to drop a dollop of the syrup in a bowl of water and it should not dissolve.
Once you reach this consistency you should pour in your Flour and Ghee mixture in to this.

(This is the crucial step, cos if you put the mixture in too soon, you will end up with a gooeey consistency and too late it will be rock hard...)
Step 2

Step 3
---> The mixture will start bubbling
---> Keep stirring it clockwise and anticlockwise as fast as you can, the goal is not let it stick to a side of the pan, it will burn and smell.
---> At one point the whole mixture will try to stick to the wooden spoon and become kind of frothy
---> At this time, slowly pour it out on to the tray you have smeared with ghee and flatten this on to the tray so you will get even sized pieces.
---> If you delay pouring it out on the tray, the mysore pak will become brown and also have a burnt smell.
 --->Let it Cool for a few minutes and then before it hardens, cut the pieces in to desired shapes with a sharp knife and remove and store. While its hot, leave the container open and when it is completely cooled, you can close the container... I guarantee that you will not sop with one piece..

(Wanted to add this as a side note, I made it again and reduced about two tablespoons from the 1 and 1/2 cups, and the sweetness was perfect for us.)
Step 3

Thursday, September 9, 2010

Mung Bean Sprout Salad - yet another version

This is a relatively simple salad. Easily serves 6 people.
You Need
Sprouted Mung Bean - 2 cups
Carrots - 4 or 5 Grated
Corn - 2 or 3 (grilled and rubbed with lemon and salt)

To see how you can make these sprouts read this.
Here is a look at my sprout maker.
Steam the Mung Bean sprouts with little water till they are slightly soft.
Let them cool.
Take the corn and remove all kernels and let cool.
Now bring the 3 of them together, and add a bit of salt and lemon juice and a teaspoon of olive oil and serve almost with anything...
I have added a bit of grated mangoes... to this but its optional....